

What Do Whetstone Grit Numbers Actually Mean?
If you've ever looked at a whetstone and wondered what the number on it means, you're not alone. The grit number tells you one thing: how fine or coarse the abrasive particles on the stone's surface are. That's it. Lower numbers mean larger, more aggressive particles. Higher numbers mean smaller, finer particles.
Think of it like sandpaper. A 60-grit sandpaper tears through wood fast but leaves deep scratches. A 400-grit sandpaper smooths things out but removes almost no material. Whetstones work the same way on steel.
Here's the practical breakdown:
- Lower grit (200-800): Coarse. Removes steel quickly. Used for repairing chips, setting new bevels, or reprofiling a damaged edge.
- Medium grit (1000-3000): The sharpening range. This is where you create and refine a working edge.
- High grit (4000-8000+): Fine polishing. Smooths the edge at a microscopic level, reducing friction and improving cutting performance.
The number itself refers to the particle density per unit area. A 1000-grit stone has smaller abrasive particles packed more tightly than a 400-grit stone, which means it removes less steel per stroke but leaves a smoother, more refined scratch pattern on the blade.
Understanding this relationship between grit number and particle size is the entire foundation of whetstone sharpening. Everything else follows from it.
What Does Each Whetstone Grit Range Do to Your Knife?
Not every grit is meant for the same job. Using a polishing stone when you need to repair a chip is like trying to buff out a dent with car wax. And using a coarse stone when your knife just needs a quick touch-up will remove more steel than necessary, shortening the life of your blade.
Let's walk through each range and what it's actually for.
400-800 Grit: Repair and Reprofiling
This is the heavy-duty range. You reach for a coarse stone when your knife has visible chips in the edge, when the bevel angle needs to be changed, or when the blade is so dull that a medium stone would take forever to bring it back.
Most home cooks will rarely need a stone this coarse. If you're maintaining your knives properly and touching them up every few weeks on a medium stone, you might go years without needing one. But when you do need it, nothing else will do the job efficiently.
1000 Grit: The Sharpening Workhorse
If you only own one whetstone for the rest of your life, make it a 1000-grit. This is the single most useful grit for kitchen knives, full stop.
A 1000-grit stone is aggressive enough to establish a new edge on a dull knife, but fine enough that the edge it produces is perfectly functional for kitchen work. You can take a knife that won't cut a tomato and, in about five to ten minutes on a 1000-grit stone, have it slicing paper-thin rounds.
For most home cooks doing a quick sharpen every two to four weeks, a 1000-grit stone is all you need. The edge won't be mirror-polished, but it will be genuinely sharp, and that matters far more than how pretty the bevel looks.
3000 Grit: The Refinement Step
A 3000-grit stone picks up where the 1000 left off. After sharpening on a 1000, the edge has microscopic scratches in the steel, tiny valleys and peaks that create friction when cutting. A 3000-grit stone smooths those scratches out, refining the edge geometry without changing the angle you set on the coarser stone.
The result is a knife that cuts noticeably cleaner. Push-cutting through herbs, you'll see the difference: less bruising, cleaner separation, less effort. The blade moves through food with less resistance because the edge is smoother at a microscopic level.
A 3000-grit stone is a worthwhile addition to your kit if you want to take your sharpening to the next level, but it's not strictly necessary for a functional kitchen edge.
6000-8000 Grit: Polishing and Finishing
This is where sharpening turns into something closer to an art form. A 6000 or 8000-grit stone produces a polished, refined edge that glides through food with almost no resistance. The scratch pattern is so fine that the edge approaches a mirror finish under magnification.
For hard Japanese steels with a Rockwell hardness above 60 HRC, a high-grit polish makes a real difference. These steels can hold a fine edge, so the extra time polishing actually translates to longer edge retention. Softer German or Chinese steels below 58 HRC may not benefit as much from ultra-fine polishing, because the steel can't maintain that level of refinement as long.
That said, there's something deeply satisfying about running a knife through a ripe tomato when the blade has been taken to 8000 grit. The tomato doesn't compress at all. The skin just opens.
Why Is a 1000/6000 Combo Stone the Ideal Starter?
If you're buying your first whetstone, a 1000/6000 combination stone is the smartest choice you can make. Here's why.
A combo stone gives you two grits in a single block: one side is 1000-grit for sharpening, the other side is 6000-grit for polishing. You flip the stone over to switch between them. It takes up half the storage space of two separate stones, costs less than buying them individually, and covers the two most important points in the sharpening progression.
The 1000-grit side handles all your primary sharpening. Dull knife? Start here. The 6000-grit side gives you a polished, refined edge when you want it. For most kitchen knives, sharpened on the 1000 side and then quickly polished on the 6000 side, the result is an edge that's both extremely sharp and long-lasting.
You might wonder: why 1000/6000 instead of 1000/3000? The 1000/6000 combination gives you a wider spread between grits, which means a more noticeable improvement when you flip to the polishing side. A 1000/3000 combo is fine, but the jump isn't as dramatic. And if you later decide to add a 3000-grit stone to your collection for a three-step progression, you already have the bookends covered.
When Do You Actually Need a Coarser Whetstone?
Sooner or later, something happens to a knife that a 1000-grit stone can't fix quickly. Maybe you accidentally cut into a bone. Maybe a knife sat in a drawer for two years and the edge is completely gone. Maybe you picked up a vintage knife at a flea market and the edge is so thick it wouldn't cut warm butter.
In these situations, a coarser stone in the 200-600 grit range saves enormous amounts of time. Trying to fix a chipped edge on a 1000-grit stone means sitting there for 30 minutes or more, slowly grinding away steel. A 400-grit stone can do the same job in five minutes.
Here are the specific scenarios where a coarse stone earns its keep:
- Chipped edges: Visible nicks or chips in the blade that you can feel with your fingernail.
- Reprofiling: Changing the angle of the bevel, such as thinning a blade from a 20-degree edge to a 15-degree edge.
- Badly neglected knives: If the knife hasn't been sharpened in over a year and won't cut paper at all.
- Flattening other stones: Coarse stones (or dedicated flattening plates) are used to keep your finer stones flat. A dished stone produces an uneven edge.
If none of those situations apply to you, don't worry about buying a coarse stone right away. Start with a 1000/6000 combo and add a coarse stone later if the need arises.
What Is the Full Sharpening Progression from 1000 to 6000 Grit?
Once you have the basics down and want to sharpen your knives to their full potential, a three-step grit progression is the way to go. Here's what a full sharpening session looks like:
Step 1: Sharpen on 1000 Grit
Soak your stone (if it's a soaking stone) for 5 to 10 minutes until bubbles stop rising. Set your angle, typically 15 degrees per side for Japanese-style knives, and work the entire length of the blade in smooth, consistent strokes. You're looking for a burr to form along the opposite side of the edge. Once you feel that burr running the full length of the blade, flip sides and repeat. Then do a few light alternating strokes to remove the burr.
This step does 80% of the work. After 1000 grit, your knife is already sharp enough to use.
Step 2: Refine on 3000 Grit
Switch to the 3000-grit stone. Use the same angle and lighter pressure. You're not trying to remove much steel here. Instead, you're smoothing out the scratch pattern left by the 1000-grit stone. Five to ten strokes per side is usually enough. You should feel the blade begin to glide more smoothly across the stone as the edge refines.
Step 3: Polish on 6000 Grit
The finishing step. Very light pressure, same angle. The stone should feel almost slippery under the blade. Five to eight strokes per side. When you're done, the edge should cleanly slice printer paper with no catching or tearing. If you hold the blade up to the light, the very edge should be invisible, meaning there are no flat spots reflecting light back at you.
Do You Actually Need All Three Grits?
No. And I want to be honest about this, because sharpening gear can become its own rabbit hole if you let it.
A 1000-grit stone, used properly and consistently, handles about 90% of what a home cook needs. If you sharpen your knives every two to four weeks on a 1000-grit stone, they will be sharp. Not polished-to-mirror sharp, but genuinely, cut-whatever-you-want sharp. And for most cooking tasks, that's more than enough.
The 3000 and 6000 grits are about refinement. They matter more for:
- Hard Japanese steels (60+ HRC): These steels benefit from fine polishing because they can hold a refined edge longer. If you own XINZUO knives made from high-carbon steel, a higher grit polish will extend the time between sharpening sessions.
- Precision cutting: If you're doing a lot of fine julienne, paper-thin fish slicing for sashimi, or delicate herb work, a polished edge makes a noticeable difference in cut quality.
- Edge longevity: A polished edge has less microscopic roughness, which means less surface area creating friction. This translates to slightly longer edge retention between sessions.
- Personal satisfaction: Sharpening can be meditative. If you enjoy the process, the progression from coarse to fine is part of the appeal.
If you're just starting out, get a 1000/6000 combo stone and don't think about it further until you're comfortable maintaining a consistent angle and raising a burr. The technique matters far more than the equipment.
Soaking Stones vs. Splash-and-Go: What's the Difference?
Whetstones need water to function. The water acts as a lubricant, carries away swarf (the slurry of metal and stone particles created during sharpening), and prevents the stone from clogging. But how you apply that water depends on the type of stone you have.
Soaking Stones
These stones need to be submerged in water for 5 to 10 minutes before use. You'll see tiny bubbles rising from the stone as the pores fill with water. Once the bubbles stop, the stone is saturated and ready to go. During sharpening, you'll splash a bit of water on the surface whenever it starts to feel dry.
Most stones in the 1000 to 3000 grit range are soaking stones. They tend to be more affordable and widely available. The downside is the prep time, but honestly, five minutes of soaking while you set up your workspace is not a big deal.
Splash-and-Go Stones
These stones just need a splash of water on the surface before you start. No soaking required. They're typically denser and harder than soaking stones, which means they dish (develop a concave surface) more slowly.
Higher-grit stones (6000+) are often splash-and-go, though there are exceptions. Some premium stones across all grit ranges are splash-and-go as well.
Maintenance Matters for Both Types
Regardless of type, always flatten your stones regularly. After every two or three sharpening sessions, rub the stone against a flattening plate (or a piece of wet/dry sandpaper on a flat surface) until the surface is even. A dished stone makes it nearly impossible to maintain a consistent bevel angle, and all the technique in the world won't compensate for a stone that's concave in the middle.
What Whetstone Options Does Xinzuo Offer?
XINZUO offers two combination whetstones designed to cover the full range of home sharpening needs:
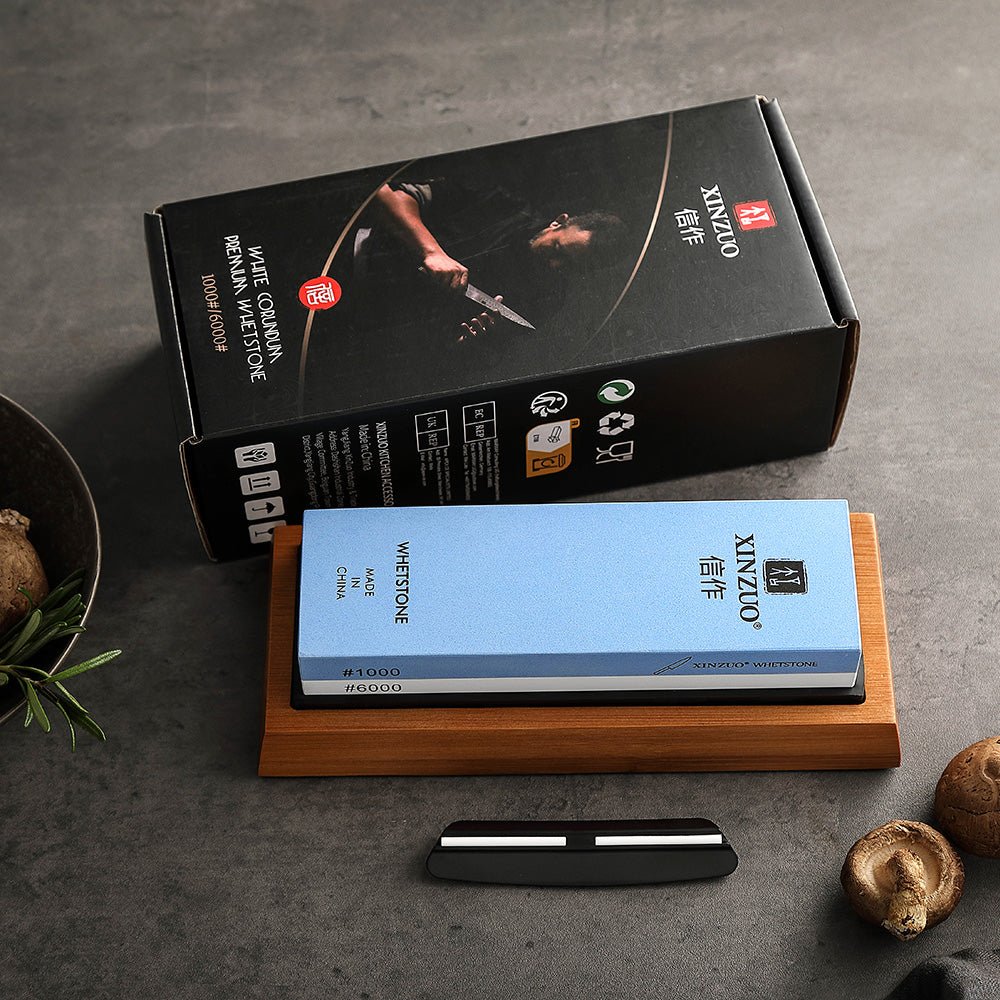
1000/6000 Grit Combination Whetstone , The all-in-one starter stone. The 1000-grit side handles all your regular sharpening, and the 6000-grit side polishes the edge to a fine finish. Comes with a bamboo base for stability during use. This is the stone I'd recommend for anyone who doesn't already own one.
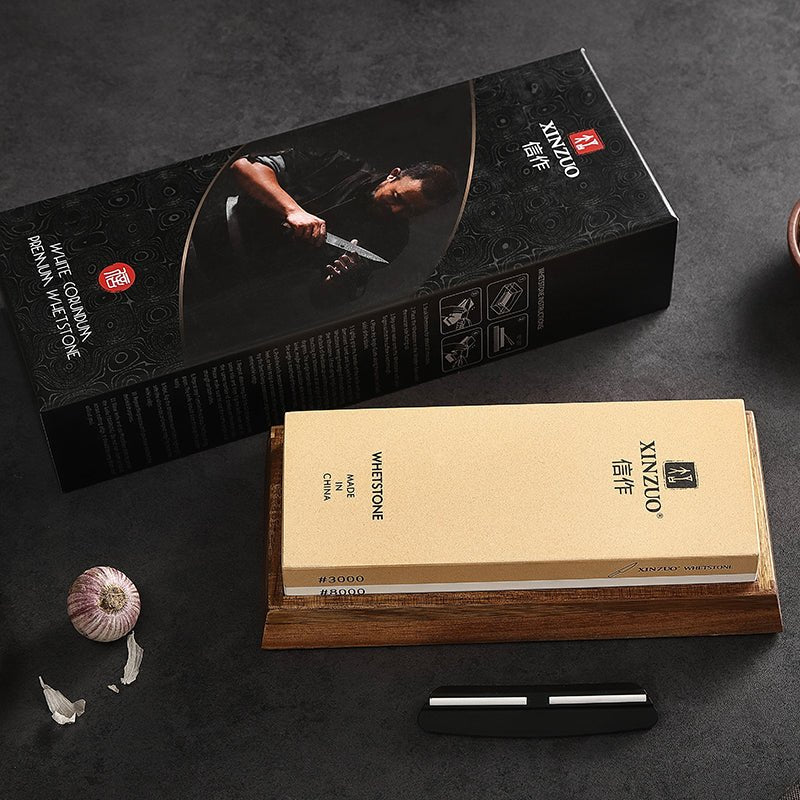
3000/8000 Grit Premium Whetstone , The refinement and finishing stone. If you already have a 1000-grit stone and want to add a polishing step, this combo takes your edges to the next level. The 3000-grit side refines the scratch pattern from your primary sharpening stone, and the 8000-grit side produces a mirror-polished edge that glides through food.
Together, these two stones give you a four-grit progression (1000, 3000, 6000, 8000) that covers everything from regular maintenance to professional-level edge finishing.
Ready to Get Your Knives Properly Sharp?
Browse the full range of XINZUO sharpening stones and accessories.
Shop Whetstones All Sharpening AccessoriesRelated Reading
Want to dive deeper into knife sharpening and maintenance? These guides cover everything from technique and angles to steel types and daily care:
- How to Sharpen Knives with a Whetstone , Step-by-step sharpening technique for beginners
- Knife Sharpening Angle Guide , How to find and maintain the right angle for your blade
- Honing Steel Guide , The difference between honing and sharpening, and why you need both
- Knife Steel Hardness Guide , Understanding Rockwell hardness and what it means for your edge
- Knife Care and Daily Maintenance , How to keep your knives in great condition between sharpening sessions
- How to Choose a Chef Knife , The complete buying guide for finding the right blade
- Knife Edge Types Guide , Single bevel, double bevel, convex, and more
- Powder Steel Knife Guide , What makes powder metallurgy steel different and when it matters
Frequently Asked Questions
Is a 1000 grit whetstone enough for kitchen knives?
For most home cooks, yes. A 1000 grit stone produces a functional, slightly toothy edge that handles everyday cutting tasks well. That micro-texture actually helps with gripping tomato skin and slicing through fibrous vegetables. Adding a 3000 or 6000 grit finishing stone refines the edge further and extends time between sharpenings, but a 1000 grit alone will keep your knives genuinely sharp.
What is the difference between a 1000 and 6000 grit whetstone?
A 1000 grit stone removes steel and shapes a new edge, doing about 80% of the sharpening work. A 6000 grit stone polishes the scratch pattern left by the 1000, producing a smoother edge with less friction. The 1000 side is where you restore a dull knife. The 6000 side is where you refine it. On harder steels above 60 HRC, the polishing step extends edge retention noticeably.
Do you need to soak a whetstone before sharpening?
Most whetstones in the 1000 to 3000 grit range need 5 to 10 minutes of soaking until air bubbles stop rising from the surface. The water fills the stone's pores and prevents metal particles from clogging the abrasive. Some stones, like Shapton Pro, are splash-and-go and only need water sprinkled on the surface. Check the manufacturer's instructions, because over-soaking a splash-and-go stone can weaken it.
Should I get a combination whetstone or separate stones?
A combination stone (like a 1000/6000) is the best starting point. It covers sharpening and polishing in one block, costs less than two separate stones, and takes up half the storage space. Separate stones become worthwhile once you want a three-step progression (1000, 3000, 6000) or need a dedicated coarse stone below 400 grit for chip repair. Start with a combo and add individual stones later as needed.
How often should you flatten a whetstone?
Every two to three sharpening sessions, or whenever you can see a visible dip in the stone's surface. A dished stone makes it impossible to maintain a consistent bevel angle, which ruins the edge geometry no matter how good your technique is. Rub the stone against a flattening plate or a sheet of wet/dry sandpaper on a flat surface until the entire face is even again.